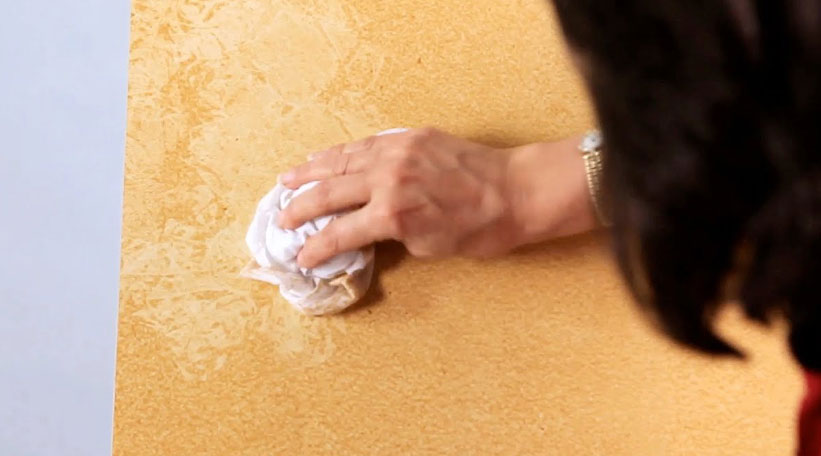
Glazing is a visually stunning way to transform your space.
By Tammy Adamson-McMullen
Glazing is a centuries-old decorative finish that involves putting a transparent coat of color over a slightly different-colored basecoat. The look is soft, lustrous and multi-dimensional—and currently popular in all sorts of settings, from restaurants and hotels to every style of home.
You’ll most commonly find glazes on feature walls, in powder rooms and on the ceilings of dining rooms. But increasingly, glazes also are becoming all-over wall color for recreation rooms, dens, master bedrooms and entertainment areas.
Many decorative artists specialize in glazing techniques, but you don’t have to hire a professional to accomplish one of the simpler glazing finishes. The glazing technique below is an example. It involves a minimal number of steps and just two types of satin paint. The first paint, which should be two to three shades lighter or darker than the second paint, is applied as the basecoat. The second paint, which is mixed with the glaze, is applied as the topcoat. Fairly simple? Yes, but the results can be stunning!
The most difficult part of glazing isn’t applying the colors but deciding which colors to use. Glazing affects the chroma, value and hue of the paint application—and these qualities change depending on whether you choose a darker basecoat color and lighter topcoat or a lighter basecoat color and darker topcoat. In general, a darker basecoat/lighter topcoat combination will yield a light and airy effect, while the lighter basecoat/darker topcoat combination will be more colorful and dramatic.
For help in color selection, visit your local paint and decorating store. Discuss the project with the retailer and the look you want to achieve. Then pick up a paint chip that has your desired color scheme. Once you’ve selected a basecoat color on the chip, you can easily select the topcoat by going up two or three color steps on the chip for a lighter color or down two or three color steps for a darker color.
There is one other point to consider before you begin: The glaze coat is created by mixing paint and glaze at a ratio of 1 to 4 respectively. Keep this ratio in mind as you determine how much acrylic glaze and topcoat color to purchase for the surface you intend to coat. As with any new technique, it’s a good idea to experiment on a sample board first before attempting it on the intended surface.
Product List
- Satin latex paint for the basecoat
- Satin latex paint for the topcoat
- Acrylic glaze—this will be mixed with the topcoat paint in a 1:4 ratio of paint to glaze
- Angled paint brush
- Paint roller and 2 trays
- Glazing applicator—either a clean, lint-free rag or special lambswool applicator
- An additional clean, lint-free rag (for removing excess paint)
- Painter’s tape
- Drop cloth
- Protective gloves
Project Instructions
- Use painter’s tape to tape off any walls, ceiling and trim that abut the surface you want to glaze.
- Place a drop cloth on the floor below to protect it.
- Apply the basecoat color. Use the brush to apply it in tight corners; use the roller and one of the trays for larger areas. Let the wall dry.
- Mix the satin topcoat paint and glaze at a rate of 1 to 4. Pour the mixture into the second paint tray for easy access.
- Dip the rag or lambswool applicator into the mixed glazing compound and begin applying it to the walls. (If needed, remove lint from the lambswool applicator beforehand by “wiping” it with a section of sticky painter’s tape.)
- Work in small sections, using light back-and-forth strokes. Gently feather out the edges of the applied paint so that there are no harsh lines.
- Take your time in corners; dab on the glazing compound very lightly in these areas to avoid a buildup of color.
- After you’ve completed two or three sections, stand back and review your work. If some areas look darker than others, smooth them again with your applicator or use the second clean rag to remove some of the excess glazing mixture.
- Continue working in small sections until the surface is finished.
Be sure to check on your glazed finish as it dries and cures. While “watching the paint dry” is an expression used to describe doing something boring, in this case it doesn’t apply! Part of the fun of creating a glazed finish is seeing the effect come to life as the topcoat cures—and then hearing the rave reviews on the finished technique from your friends and family.

 Interior Paints
 Exterior Paints
 Primers
 Stains & Clears
 Paint Brushes
 Paint Roller
 Paint Trays & Liners