Here are tips for creating holiday table settings, using products from your local paint store.
By Tammy Adamson-McMullen
It’s a fair bet that more dining tables are formally set between Thanksgiving and New Year’s Day than any other time of year. Creating a dazzling table for these occasions can be stressful. This year, let the stress go! All you need is a little bit of time, a few miscellaneous materials and, believe it or not, a trip to your local paint store. Here are three fun and easy projects—with accompanying product lists and instructions—to make your table a standout.
Mason Jar Arrangement
Supplies:
Gloves (wear for painting)
Spray paint suitable for glass, in holiday colors
5 or more mason jars of varying heights
Seasonal florals, such as holly sprigs, pussy willows or branches of leaves
Sprinkles—acorns, colorful leaves, holly berries or small ornaments
Optional:
Self-adhesive decal
Painter’s tape
Plastic wrap
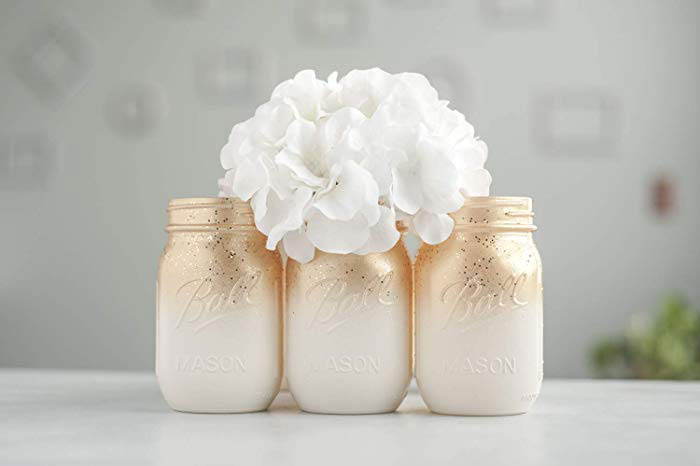
Old mason jars make beautiful vases, especially when they’re spray-painted in holiday colors. To create the vases, clean the mason jars thoroughly and allow them to dry. Next, carefully spray-paint the inside of each can, turning the jar slowly as you go. Apply two to three light coats, depending on the look you want to achieve. Viola! The jar is done, unless you want to incorporate a design. In this case, apply a self-adhesive decal to the outside of the jar, pressing down firmly to make sure it adheres. Then, spray-paint the outside in the same color as the inside. Apply two coats; remove the decal once the paint has dried.
It’s possible to paint the jars in two colors—with one color on the inside and another on the outside. Once the inside of the jars have dried and cured, apply painter’s tape to the inside lip of each one and then fill the jars with crumpled-up plastic wrap. Now you can spray the outside without worrying about overspray. Tip: It’s better to apply a darker color on the outside and lighter on the inside.
Fill the jars with florals and arrange the vases in the center of the table. Depending on the holiday, sprinkle acorns, colorful leaves, holly berries or small ornaments around the base.
Other suggestions: Choose table linens in colors that coordinate with the vases and flowers. If desired, paint additional mason jars and put at each place setting to hold napkins or flatware.
Country Pumpkins
Supplies:
Gloves (wear for sanding and painting)
Slat of barn wood—3′ or longer
220-grit sandpaper
Vacuum cleaner
Penetrating clearcoat sealer
2″ or 3″ nylon /polyester paint brush
Autumn leaves
Collection of faux or real pumpkins and gourds
Tea candles or small pillar candles
The board in this centerpiece serves as the base and should be at least 3 feet long but can run the entire length of your table. Sand the board to remove splinters, but stop before the surface is too smooth. Vacuum the board to remove sanding dust. Next, brush on a coat of the sealer to protect the board for future use. Apply a second coat if you intend to use real leaves and gourds, which can stain the surface. Once the paint has dried and cured, position the board in the center of your table. Sprinkle it with leaves and place pumpkins and gourds on top. Arrange candles in between for ambiance.
Other suggestions: Use table linens that coordinate with the colors of the gourds. Roll up napkins, tie each with jute rope and tuck in a brightly colored leaf.
Drawer/Tool Box Container
Supplies:
Gloves (wear for sanding and painting)
Wooden drawer or tool box
220-grit sandpaper
Wiping cloth and vacuum cleaner
Acrylic paint in desired color
2″ nylon/polyester brush
Plastic sheeting
Small potted mums or poinsettias
Dried moss
Sand the drawer or tool box until smooth. Wipe with a cloth to remove the sanding dust and vacuum the inside. Use the brush to paint the container in your desired color. Add a second coat if desired. Once the container is dry, cut plastic sheeting to fit into the container as a liner. Place small potted plants into the container and cover the tops with dried moss to hide the individual pots and liner below.
Other suggestions: For a more rustic look, try white-washing the container instead. Before painting, mix one part paint to one part water. Brush the mixture liberally onto the container. After one minute, wipe off the excess, paying special attention to the corners where the mixture might have pooled. Repeat as necessary for the look you want to achieve.

 Interior Paints
 Exterior Paints
 Primers
 Stains & Clears
 Paint Brushes
 Paint Roller
 Paint Trays & Liners